
Management of white spot lesions
Decalcification is the number 1 reason that orthodontic practitioners get sued. Therefore, preventing decalcification and white spot lesions is an important aspect of management of legal risks associated with orthodontic treatment. And even more important than the legal considerations are the aesthetic implications for your patients. Improving dento-facial aesthetics is one of the primary reasons that patients seek orthodontic care. Aesthetics are severely compromised when decalcification rears its ugly head. Prevention of these problems leads to better aesthetics and, as a result, more satisfied patients. In this post, I will discuss prevention and treatment of white spot lesions. Numerous links to articles and product information are included in the post. This gives you the opportunity to learn the best techniques for prevention and treatment of this problem.
Preventing decalcification
Nothing works better than good oral hygiene. Take the time to explain and show proper brushing techniques to your patients. At each monthly visit, carefully evaluate the patient's hygiene. Continually work with the patient on brushing technique, making sure the patient is aware of areas he or she may be missing when brushing. Nightly use of a fluoride mouth rinse has been shown to be very effective at preventing decalcification.
http://www.ncbi.nlm.nih.gov/pubmed/12917928
http://www.actfluoride.com/dental-professionals/act-total-care-64-oz-professional-use-dispenser/
Also, make sure the patient gets his or her teeth cleaned regularly. In my practice we schedule all orthodontic patients for prophys at 4 month intervals. This is slightly more expensive for the patient (most dental insurance covers prophylaxis at 6 month intervals, so 1 cleaning a year is usually not covered by dental insurance), but the benefits gained outweigh this small disadvantage. The method of choice for efficient cleaning of teeth with bonded and banded appliances is a prophy jet (see links below for more information).
http://www.dentsplymea.com/content/cavitron%C2%AE-prophy-jet%C2%AE
http://www.dentsply.com/media/345951/dual_select_80518__r9__0512_.pdf
Smooth surface sealants
These are a relatively new class of products; the results achieved in elimination of decalcification have been impressive. Smooth surface sealants can be applied to the whole facial (or buccal) surface of teeth after etching. After curing the sealant, use your preferred bracket adhesive as directed. Some clinicians prefer to place this material around the brackets after orthodontic bonding is completed. Both techniques work well.
http://www.ncbi.nlm.nih.gov/pmc/articles/PMC3242403/
http://www.relianceorthodontics.com/store/product.php?productid=37
Instructions for Use of PRO SEAL® and L.E.D. PRO SEAL® (courtesy of Reliance Orthodontic Products)
1. APPLICATION: Dispense a drop or two of PRO SEAL® onto a mixing pad. With a brush, apply a thin uniform layer on the etched enamel surface. Stroke over with the same brush to ensure a thin layer and proper coverage. If not applied in a thin layer, LED PRO SEAL® may appear yellow.
If using original PRO SEAL®, cure each tooth for 20 seconds with any corded halogen, plasma or LED curing light (390 – 440 nM). If using L.E.D. PRO SEAL®, cure each tooth for 20 seconds with any corded halogen, plasma or LED curing light (440-480 nM). The material is compatible with the majority of orthodontic adhesives.
Note: In order for PRO SEAL® to remain on a normal tooth surface, it must be applied to properly conditioned, dry enamel. Atypical enamel should be first etched and then conditioned with multiple coats of Enhance™ Adhesion Booster or Assure® Universal Bonding Resin, then lightly dried before the PRO SEAL® is applied. In order for PRO SEAL® to completely cure, a proper intensity light must be used for the prescribed time at close range.
If PRO SEAL® is cured and saliva contamination occurs, the contaminated tooth can be cleaned by dabbing lightly with Enhance™ or Assure® Sealant and dried with air.
2. REMOVAL OF SEALANT RESIN: After the adhesive paste has been removed with a Renew™ System Bur (#118S, #118L or #218), removal of PRO SEAL® sealant is easy. Use the #383 Renew™ System Point on your choice of handpiece. Lightly polish the entire tooth surface with the #383 rubber point where PRO SEAL® has been applied. Note: If patient will visit the hygienist during treatment, the enamel should not be cleaned with a prophy jet as this can remove the PRO SEAL®. Use fine pumice for cleaning.
A final note about prevention of decalcification
As dental practitioners, our most important duty when treating patients is to do no harm. Keeping this in mind, if, despite your best efforts, decalcification is occurring, the best thing to do is to stop the damage by removing the braces. In the great majority of cases, poor patient cooperation is the primary reason that decalcification occurs. Mouth rinses and sealants will often not prevent decalcification if the patient's hygiene is poor. In these cases (even though it may not seem like it at the time) the best thing you can do for the patient is to take the braces off. The teeth won't go away; orthodontic treatment may be re-initiated after hygiene improves. Following this advice will prevent a lot of problems. Logistically, early removal is a hard thing to do. Payment plans must be altered and it is not easy to convince a parent that this is the best course of action. But often it is the right thing to do, and waiting for a child to mature a little before re-treating will prevent a lot of future dental problems.
Management of white spot lesions
Despite our best efforts, decalcification does occur. It is never a good day at the office when white spot lesions are discovered when braces are removed. Fortunately, there are some new techniques that can be used to eliminate (or at least minimize) the size and scope of white spot lesions. The two best techniques are microabrasion and at home application of CPP-ACP.
Microabrasion is a technique where a combination of acid and pumice are used to remove enamel irregularities and discoloration defects. A step by step set of instructions as well as some case studies are presented in the article which can be accessed by using this link:
http://www.dentalaegis.com/cced/2011/04/smile-restoration-through-use-of-enamel-microbrasion-associated-with-tooth-bleaching
Studies show (see references in the article) that enamel microabrasion removes a "clinically insignificant" amount of enamel from the tooth surface. Additionally, the newly exposed enamel demonstrates a significant resistance to demineralization. For most patients 4 treatments done at 2 week intervals greatly reduce the size and discoloration of the lesions. For more information on this technique, go here http://www.youtube.com/watch?v=Zwkp5MBa9X8 and here http://www.dentalcare.com/en-US/dental-education/continuing-education/ce1004/ce1004.aspx?ModuleName=coursecontent&PartID=2&SectionID=-1
The second technique which can be used to eliminate white spot lesions involves the use of casein phosphopeptide amorphous calcium phosphate (CPP-ACP). The most widely used product is called MI Paste and is distributed by by GC America. For information about this product, follow this link http://www.breezecare.com/mediacenter/recaldent/orthomousseplus.pdf
MI Paste is intended for at home use. Patients apply the paste to the affected areas once a day for about a month. The material is rubbed on with either a q-tip or a finger tip. Lesion reduction is maximized if at each application the material is allowed to sit undisturbed for at least 3 minutes.
http://www.orthotechnology.com/product_literature/pdfs/B-MI_PREVENTATIVE.pdf
A final note
Many clinicians are reporting spectacular results in elimination of white spot lesions by using a combination of the two techniques. The Angle Orthodontist November 2012 issue contains an article describing how to combine these techniques. The article also reports results attained by doing this. You can access that article here: http://www.angle.org/doi/pdf/10.2319/090711.578.1
I strongly encourage you to read this article. It is very well written and provides a great summary of the methodology and potential results that can be obtained by using these techniques. You will benefit your patients by offering these services.
Friday, November 30, 2012
Sunday, May 20, 2012
Bracket repositioning
Question: In this treatment, initial leveling and aligning is complete, so it is time reposition the brackets. Here is the panorex. How do I know what brackets to reposition? Do I look at the way roots are supposed to be? In this case, no repositioning has been done; I just want to be certain I get the concept of repositioning brackets. Thanks for your time.

 Is there a method to quickly determine how to position brackets to achieve optimal root position? Fortunately, there is. Focus on the inclination of the bracket slot. If distal root movement is needed, angle the bracket slot disto-gingivally, and if mesial root movement is needed, angle the slot meso-gingivally. Look at the example below.
 The outlined tooth (red) represents the current root position. To tip the root to the distal, change the inclination of the bracket slot so it is angled disto-gingivally.

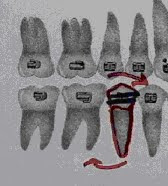

Right Left
Answer: Yes you do reposition brackets based on root position as viewed on on the panorex as well as (on premolars and molars) marginal ridge heights as viewed in the mouth. Ideal bracket positioning results in slight distal inclination of all the roots. In this case, I would reposition both upper lateral brackets because both roots are mesially inclined. By aligning the long axis of the bracket with the pulp canal (rotate both brackets disto-gingivally) distal root inclination will be accomplished. Also, the upper 1st premolar roots need more distal inclination and, on the lower, both lower 5's and the lower right 2 need more distal root inclination. After repositioning, use 016niti for a month to align the repositioned brackets. After aligning is accomplished, continue with mechanics. Here is a way to help position brackets correctly: At the repositioning appointment, take a panorex to check for incorrectly positioned brackets. Evaluate root position (also called 2nd order position), and reposition the brackets to improve root position. Also check posterior marginal ridge height and reposition brackets to obtain level marginal ridges. Repositioning is time consuming and difficult, but correcting 2nd order inclination will result in much better occlusion. Root inclination is the main focus of repositioning because 2nd order arch wire bends are difficult to make. When repositioning, first identify teeth with incorrect root inclination. Reposition the brackets on those teeth so the long axis of the bracket is parallel to the pulp canal. Ideally, brackets should be checked (and repositioned, if necessary) twice during treatment. The first repositioning is done after the wire progression is complete (usually about 7 to 10 months into treatment) and the second repositioning is done at the start of finishing (usually about 4 months before removal). Look at the x-ray below and evaluate root position. 


Here is how a correctly positioned
bracket should look.


Notice how changing the slot inclination changes how the root will be positioned. (Thanks to Gerry Samson, for allowing the use of these photos. You can find more information about Gerry’s CE courses at www.gnathosce.com .
Saturday, March 3, 2012
More Questions and Answers

I have a concern about this case. She has 016 nitinol in both upper and lower arches. Her right side looks good. My question involves the slight open bite on the right side. When and how should I correct it? Should I wait until I get to a stiffer rectangular wire, then use elastics?
There are two reasons why the bite is open in the canine area. First, the wire is not completely unloaded. It needs more time to totally straighten. In other words, if you look at the shape of the wire between the lateral and 1st bi, it is not straight, but still slightly rounded. It will be straighter after another 4 weeks, so the lateral open bite will be less. Second, the bracket positioning is contributing to the problem. Overall this is a beautifully bracketed case-clean and accurate. Good job! However the canine bracket is a little too incisally placed for a case that needs virtually no bite opening. Because of this it is not erupted enough. Reposition the bracket 1.5mm to the gingival and your problem will be solved.
The bite opening in the premolar area occurs because Newton’s 3rd law always works. The opposite reaction to pulling the canine down is an intrusive force on the premolars and lateral incisor. This minor movement will resolve when you use stiffer wires. Settling issues such as these are more easily corrected in light wires as opposed to stiffer rectangular wires as you suggested. The stiff wire will overpower the elastics, rendering them ineffective. That is why many times problems such as these are corrected during finishing. The lighter wire, combined with finishing bends, may be enough to help this case settle. If finishing bends alone don’t solve the problem, use finishing elastics in addition to the finishing wire.
Thanks for taking my call the other day; look at this case and note how his bite is not opened sufficiently; additionally he's popping off lower anterior brackets quite frequently. You suggested to return to 016 stainless steel with curves to open the bite. I did this earlier in the treatment and followed the 016 wire with 020 stainless steel with curves. His bite simply won't open (he appears to have strong musculature). I continued treating him with the 50% overbite. I moved on to rectangular wires, placed composite on the lower 1st molars to open the bite, and began space closure. As I close the space, he is still popping a lot of brackets off. At his most recent visit, I placed composite on the 12yr molars to further open his bite. I also removed the composite off of the 6yr molars. This resulted in a posterior open bite. What should I do? On the phone you recommended I go back to 016S with deep curve to open bite...but somehow I don't think it will work. Is bracket positioning the problem?
Your bracket placement is good- the inciso-(and occluso-) gingival position of the brackets on each individual tooth is consistent. Additionally, your bracketing technique appears to be good because the lack of excess cement around the brackets shows that you are cleaning up well. I would probably have placed my upper 3-3 brackets much more incisal- 2 or 3 mm more incisal than you have them- but I don't know if it's worth repositioning all of them at this point. I guess that if all else (see below) fails, I would reposition.
I don't want the uppers to flare so I would not curve the upper wire. (Remember, intrusive forces create the potential for labial crown rotation.) Keep the curved lower wires in until the overbite is 2mm or less. This will take some time. Also, I would bond more composite on the lower molars to open the bite more. This takes occlusal forces out of the game and bite opening will proceed more quickly. Use deep curve in an 016 stainless steel in for a month followed by moderate curve in 020st steel for a month. If this doesn't completely open the bite, increase the curve in the 020 until it is open. Do no upper space closure until the bite is open- that is until the overbite is 2mm or less. Again, NO space closure until the overbite is corrected (don't cheat-it's tempting).
Do you have double buccal tubes on the lower molar bands? If so you may want to consider an overlay utility wire to intrude lower anteriors. This is very complex stuff so it would require a lot of communication between us. Try the curves 1st and evaluate the overbite in 3months.
I have a question regarding molar band and bracket position; especially the second bicuspid brackets. I often find I have problems when I cement molar bands and bond brackets. After I cement the molar bands, I bond the brackets starting with the central incisors and working towards the second bicuspids. I often see large discrepancies of the wire slot height between the molar band and the second bi bracket slot even though the molar bracket slot is positioned close to the middle of the tooth. This happened when I banded and bonded Sarah's teeth today and I had to remove and recement (more occlusally) the molar bands so they were more even with the second bi bracket slot. I do measure the height of the teeth on the model before bracketing so I know how far to bond from the incisal/occlusal aspect. Do I just need to eyeball the molar band position better? Are there any tips or tricks to minimize the molar to second bicuspid discrepancies?
The most important consideration is to use a molar band that is the correct size. Many clinicians use bands that are too large; this causes the band to slide gingivally resulting in the problem you described. If the correct band size is selected, it is much easier to position the band, and hence the bracket, correctly. They just don't slide too gingivally very often (one exception may be when the upper 1st molars have a large 5th cusp). From a mechanical standpoint this is often deleterious to the case because the molar will over erupt and roll in lingually when the bands are too gingivally positioned. This can result in narrowing of the arches which can lead to a whole host of problems (difficulty in ClassII correction comes to mind).
Fitting bands well requires good spacing. Make sure the spacers have worked. If you are forced to wiggle a band through a tight contact, only a band that is too large will get through the contact point because you need "wiggle space". This will result in the band and therefore the bracket being positioned too gingivally. If you don't have space you can bond 5-5 and replace the spacers and reappoint for band seating.
Many clinicians bond in different ways but I like to bond starting with the upper left 5 then work around the arch. I usually seat bands after bonding is complete. That way the patient is "freshest"-most cooperative and not experiencing a lot of salivary flow- when bonding. Finish the bonding, take a break (this is a good time for some hygiene instruction) then band. After all the brackets are placed it is easier to see if the molar band is positioned correctly because you can compare it to the rest of the brackets.
The bottom line is this: a good fitting molar band will automatically result in correct bracket placement. The only way to fit molar bands correctly is to have good spacing. So make sure those spacers are used properly and a lot of problems will be solved.
When you make an occlusally directed gable bend, is the apex or tip directed occlusally (as in an upside down triangle)? Why can’t I just close the spaces on a rectangular wire to avoid detorquing problems? At what stage of the wire sequence can I start closing anterior diastemas? I have a case where I am using .020 stainless steel wires with rocking chair curve on the lower to open the bite. The patient has upper anterior spacing from 3 to 3 (spaces were present pre-treatment). Can I close these spaces at the same time while I am opening the bite with the .020 SS? What is the best way to close the spaces? Can I also correct midline discrepancies at this stage of the wire sequencing while opening the bite?
If the space is small (3mm or less) I usually close on 020stainless steel. Close larger spaces on rectangular wire. The reason for this is a lot of space closure on round wire may result in detorquing of the upper anterior teeth, which may be unaesthetic. There is much less loss of torque when closing spaces on large (019x025) rectangular wire. Detorquing is always a problem with chain on round wire. Therefore, if the space is too big, closing on rectangular wire is a good idea. For large (greater than 4mm) diastemas, close the space on large rectangular wire until the space remaining is 2mm. Then use .020stainless steel with a gable bend between the centrals. When closing diastemas on round wire, I often place an occlusally directed gable bend (center bend) between the centrals. The apex of the "V" is directed gingivally. This separates the roots and brings the crowns closer together (tips the roots distally and the crowns mesially) which makes the space closure more stable. Root position is very important for long term stability of the space closure. Closing only a couple of millimeters on round wire with chain doesn't significantly affect the torque. Use chain to close spaces (3-3 for small spaces and 6-6 for larger spaces. Use 6-6 to prevent spaces from opening distal to the canines).
If there is spacing, midlines can be aligned at the 020 stage by shifting teeth if the midline shift is only 1 or 2 millimeters. If the spacing and/or midline shift required is more than 2mms, use chain on rectangular wire to make the correction. Again, prevent loss of torque by closing more than 2mm of space on rectangular wire. Use chain for this procedure. If no spacing exists, use some combination of ClassII, ClassIII, and oblique elastics to shift the midline. When doing this, remember to “skew” the archwire (expand the side of the wire in the direction you want the midline to shift).
I repositioned the lower right 2 about 1 mm gingivally to help lock in the occlusion. I used .016 nitinol on the lower and .016 stainless steel on the upper. I want to increase the overbite by 1 to 2mm. Should I reposition the upper anteriors gingivally or can I use a triangular elastic to bring them down? Also, the lower right 6 is tipped lingually. How do I upright this? Will this be corrected once I shift to rectangular wire? Do I still need to use rectangular wire if I don’t need to change the torque of the teeth?
The bite is slightly open because the bicuspid brackets(especially the upper) are a little gingivally positioned, which results in a small amount of bite opening. I wouldn't reposition brackets because the bite will settle and deepen a little after removal. Finishing (step up bends in the lower anterior and step down bends in the upper anterior) combined with finishing elastics on a finishing wire (I like 018 stainless steel) will increase the overbite by 1 to 2mm.
The lower 6 often rolls in (rotates lingually) because the bracket is positioned too gingivally. That causes extrusion and therefore lingual rotation (remember any extrusive force has the potential to create a lingual rotational tendency, or moment). The bracket must be repositioned 2mm towards the occlusal. Either use direct bond a bracket or fit a new band.
After I change the band on the 6, should I use a .016 nitinol or I can go straight to a finishing wire (.018 stainless steel)? How long before this molar uprights? After removal of the braces, will the bite settle if I use both upper and lower full coverage plastic retainers? If no torque change is required, do I need to use rectangular wire?
Reposition the band, go to 016 nitinol for a month, then to finishing wires. The molar will take 6 weeks to upright. If it doesn't upright as a result of bracket repositioning, use rectangular wire (019x025 nitinol is effective)for 6 to 8 weeks. You will need torque control (rectangular wire) in this situation about half of the time. No rectangular wire is necessary if the torque is OK, provided you don’t have to do any mechanics such as Class II correction or space closure. Applying elastics or chain may cause a loss of torque so do these mechanics on rectangular wire, even if the torque is acceptable. Remember, it is far more difficult to reestablish torque than it is to maintain it.
Finishing bends are used to resolve minor settling issues. One of the reasons I like a lower 3-3 lingual bonded retainer is because settling can occur. Essix (clear plastic full coverage)upper and lower retainers don't allow this. Many clinicians make a lower 3-3 Essix to solve this problem. I don’t like these retainers because of their size (they are so small that they don’t seem to fit as well as the full coverage retainers). They are also tough to make. However, the Essix manual does recommend lower 3-3 plastic retainers so it may be something you want to try.
Subscribe to:
Posts (Atom)